前言
在现代 Web 应用程序中,安全性是至关重要的一个方面。Spring Security 作为一个功能强大且广泛使用的安全框架,为 Java 应用程序提供了全面的安全解决方案。本文将深入介绍 Spring Security 的基本概念、核心功能以及如何在应用程序中使用它来实现认证和授权。
一、Spring Security
Spring Security 是一个基于 Spring 的安全性框架,用于提供身份验证、授权、攻击防护等安全服务。它构建在 Spring 框架之上,利用依赖注入和 AOP 等功能,使得集成到现有的 Spring 应用程序中非常简单。
在开始深入了解 Spring Security 之前,我们需要了解几个核心概念:
- Authentication(认证):验证用户的身份,通常是通过用户名和密码进行。
- Authorization(授权):确定用户是否有权限执行特定操作或访问特定资源。
- Principal(主体):代表当前用户的抽象概念,通常是一个实现了 UserDetails 接口的对象。
- Granted Authority(授权权限):表示用户具有的权限,通常是角色或权限的集合。
- Access Control(访问控制):定义了哪些用户可以访问应用程序的哪些部分以及如何限制对资源的访问。
二、快速入门
-
添加 Spring Security 依赖项:首先,在 Spring Boot 项目中添加 Spring Security 的依赖项。
<dependencies> <!-- Spring Boot Web Starter 依赖,包含了开发 web 应用所需的所有基础依赖 --> <dependency> <groupId>org.springframework.boot</groupId> <artifactId>spring-boot-starter-web</artifactId> </dependency> <!-- Spring Boot Security Starter 依赖,包含了开发安全应用所需的所有基础依赖 --> <dependency> <groupId>org.springframework.boot</groupId> <artifactId>spring-boot-starter-security</artifactId> </dependency> </dependencies> <dependencyManagement> <dependencies> <!-- Spring Boot Dependencies POM,用于管理 Spring Boot 项目的所有依赖的版本 --> <dependency> <groupId>org.springframework.boot</groupId> <artifactId>spring-boot-dependencies</artifactId> <version>2.7.5</version> <type>pom</type> <scope>import</scope> </dependency> </dependencies> </dependencyManagement> -
配置安全策略:创建一个配置类来配置 Spring Security 的行为。
@Configuration @EnableWebSecurity // 注解启用 Spring Security 的 web 安全支持 public class SecurityConfig { } -
定义一个访问端点:定义一个测试使用的访问端点
@RestController @RequestMapping("/test") public class TestController { @RequestMapping("/hello") public String hello() { return "hello spring security"; } } -
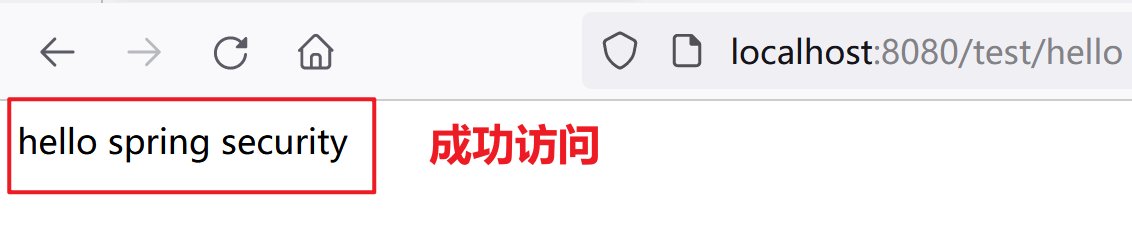
运行应用程序:运行 Spring Boot 应用程序,并尝试访问端点
localhost:8080/test/hello。

默认账号是
user,密码如下图所示:
输入默认账号、密码之后:
三、核心功能
3.1 身份验证(Authentication)
Spring Security 提供多种身份验证机制,包括基本认证、表单认证、OAuth、LDAP 等。支持自定义身份验证流程,可以根据应用程序的需求进行定制。开发人员可以根据需要配置请求路径是否需要认证才能访问。例如:
@Configuration
@EnableWebSecurity
public class SecurityConfig {

    @Bean
    public SecurityFilterChain securityFilterChain(HttpSecurity http) throws Exception {
        http.authorizeRequests()
        .requestMatchers(new AntPathRequestMatcher("/test/hello")).permitAll() // 允许所有用户访问 "/test/hello" 路径
        .anyRequest().authenticated(); // 表示所有其他的请求都需要经过认证

        return http.build();
    }
}
3.2 授权(Authorization)
Spring Security 可以基于角色(Role-Based Access Control)和权限(Permission-Based Access Control)的访问控制。
@Configuration
@EnableWebSecurity
public class SecurityConfig {

    @Bean
    public SecurityFilterChain securityFilterChain(HttpSecurity http) throws Exception {
        http.authorizeRequests()
        // 只有具有 "add" 权限的用户才能访问 "/test/hello" 路径
        .requestMatchers(new AntPathRequestMatcher("/test/hello")).hasAuthority("add");

        return http.build();
    }
}
3.3 漏洞防护(Protection Against Exploits)
Spring Security 可以防范常见的攻击,如跨站点请求伪造(CSRF)、点击劫持等。例如,通过如下配置可开启 CSRF 保护:
@Configuration
@EnableWebSecurity
public class SecurityConfig {

    @Bean
    public SecurityFilterChain securityFilterChain(HttpSecurity http) throws Exception {
        // 配置跨站请求伪造(CSRF)的保护
        http.csrf();
        return http.build();
    }
}
四、高级功能
4.1 会话管理(Session Management)
Spring Security 提供了会话管理的功能,包括会话超时、并发登录限制、会话固定攻击防护等功能。例如,可以通过如下配置开启并发登录限制:
@Configuration
@EnableWebSecurity
public class SecurityConfig {

    @Bean
    public SecurityFilterChain securityFilterChain(HttpSecurity http) throws Exception {
        http.formLogin() // 启用了表单登录
        .and()
        .authorizeRequests().anyRequest().authenticated() // 所有请求都需要经过认证
        .and()
        .sessionManagement(session -> session.sessionCreationPolicy(SessionCreationPolicy.STATELESS)) // 设置会话创建策略为无状态,即 Spring Security 不会创建会话
        .sessionManagement().maximumSessions(1).maxSessionsPreventsLogin(true); // 设置每个用户的最大并发会话数为 1,并且当达到最大并发会话数时,阻止新的登录请求

        return http.build();
    }
}
4.2 密码编码(Password Encoding)
Spring Security 提供密码加密和验证机制,确保用户密码的安全性。例如,要使用 BCrypt 加密,只需进行如下配置即可:
@Configuration
@EnableWebSecurity
public class SecurityConfig {

    @Bean
    public PasswordEncoder passwordEncoder() {
        return new BCryptPasswordEncoder();
    }
}
4.3 基于注解的方法级安全控制
Spring Security 允许在方法上使用注解的方式进行访问控制。
@Secured("ROLE_ADMIN")
public void secureMethod() {
    // 只有具有 ROLE_ADMIN 角色的用户可以访问
}

@PreAuthorize("hasRole('ADMIN')")
public void preAuthorizeMethod() {
    // 在方法调用之前进行授权检查
}
要使用注解的方式,需要使用 @EnableMethodSecurity 注解开启这一功能
@Configuration
@EnableWebSecurity
@EnableMethodSecurity // 开启基于注解的方法级安全控制
public class SecurityConfig {}
除此之外,Spring Security 支持使用表达式语言 (SpEL) 来定义复杂的访问控制规则。
@PreAuthorize("hasRole('ROLE_USER') and #id == principal.id")
public void updateUser(Long id) {
    // 只有具有 ROLE_USER 角色且 id 等于当前用户的 principal.id 的用户可以访问
}
4.4 事件监听
Spring Security 允许监听安全事件,例如登录成功、失败、登出等,以便记录日志或执行其他操作。
@Component
public class AuthenticationEventListener implements ApplicationListener<AuthenticationSuccessEvent> {

    @Override
    public void onApplicationEvent(AuthenticationSuccessEvent event) {
        // 处理认证成功事件
    }
}
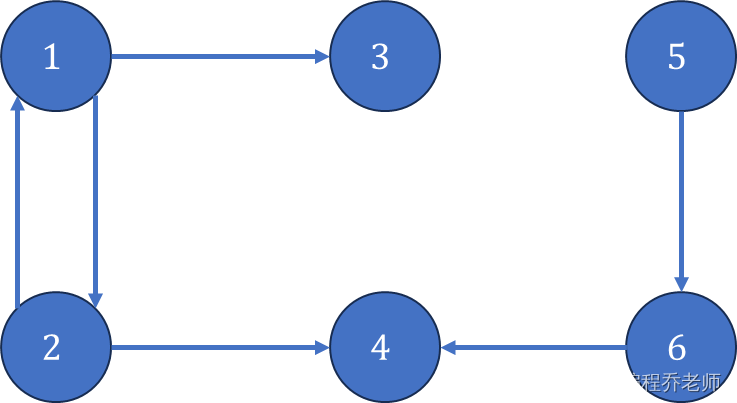
五、工作原理
Spring Security 的设计有那么亿点复杂,我们通过分开描述其核心工作流程、认证工作流程、鉴权工作流程来阐述其工作原理。
5.1 核心工作流程
Spring Security 的核心工作流程如下:
- 用户发送请求:用户通过浏览器或客户端发送请求到应用程序。
- 请求进入过滤器链代理(FilterChainProxy):所有请求首先进入
FilterChainProxy,它是一个标准的 Servlet 过滤器 (javax.servlet.Filter)。FilterChainProxy 的作用是根据请求的路径(URL)匹配合适的 SecurityFilterChain。 - 请求进入安全过滤器链(SecurityFilterChain):匹配到相应的
SecurityFilterChain后,请求进入该安全过滤器链。SecurityFilterChain 是由多个安全过滤器(SecurityFilter)组成的序列,每个安全过滤器按顺序处理请求。 - 执行安全过滤器(SecurityFilter):每个安全过滤器 (
SecurityFilter) 负责执行特定的安全操作和策略,例如身份认证、授权、会话管理等。 - 调用认证管理器(AuthenticationManager):
AuthenticationManager是 Spring Security 的核心接口之一,负责处理认证请求。在认证过程中,AuthenticationManager 通常会使用AuthenticationProvider来进行具体的认证操作。 - 返回认证结果:AuthenticationManager 返回认证结果给
SecurityFilter。 - 返回过滤器链:认证完成后,SecurityFilter 可能会进行一些额外的安全处理,并将请求继续传递给下一个安全过滤器或者返回给
SecurityFilterChain。 - 返回过滤器链代理:处理完所有安全过滤器后,请求最终返回到
FilterChainProxy。 - 返回响应:
FilterChainProxy将最终的响应返回给用户,完成整个请求-响应周期。

FilterChainProxy:
- 作用:FilterChainProxy 是 Spring Security 中的一个核心组件,它负责管理 Spring Security 中的各种过滤器链。当一个 HTTP 请求到达应用程序时,FilterChainProxy 会将该请求传递给一个或多个 SecurityFilterChain 实例进行处理。如果需要,FilterChainProxy 还可以重定向请求或返回错误信息。
- 设计目的:FilterChainProxy 的设计目的是提供一个统一的入口点,用于管理和协调 Spring Security 中的所有过滤器链。
- 例子:假设我们正在开发一个 Web 应用程序,该应用程序有多个端点,如
/public、/user和/admin。我们可能希望 /public 端点对所有人开放,/user 端点只对已登录用户开放,而 /admin 端点只对管理员开放。在这种情况下,你可以使用 FilterChainProxy 来管理三个不同的过滤器链,每个过滤器链负责一个特定的端点。
SecurityFilterChain:
- 作用:SecurityFilterChain 是一个顶层接口。SecurityFilterChain 和 Servlet 中的 FilterChain 一样,同样维护了很多 Filter,这些 Filter 由 Spring Security 提供,每个 Filter 具有不同的职能。
- 设计目的:SecurityFilterChain 的设计目的是为了支持添加一个或多个 SecurityFilterChain,每个SecurityFilterChain 负责不同的请求(比如依据请求地址进行区分),这样可以为不同的请求
设置不同的认证规则。 - 例子:继续上面的例子,我们可能会为 /public 端点创建一个 SecurityFilterChain,该过滤器链包含一个检查请求是否为 GET 的过滤器。对于 /user 和 /admin 端点,我们可能会创建包含身份验证过滤器的 SecurityFilterChain,该过滤器检查用户是否已登录,并根据用户的角色(用户或管理员)授予相应的权限。
SecurityFilter:
- 作用:SecurityFilter 是 Spring Security 的过滤器,每个过滤器负责处理特定的安全任务。当请求到达应用程序时,它会依次通过过滤器链中的每个过滤器,直到到达目标资源。在过滤器链中,每个过滤器都可以对请求进行拦截、修改或执行其他操作,以确保应用程序的安全性。
- 设计目的:SecurityFilter 的设计目的是为了提高 Web 应用程序的安全性、可维护性和可扩展性。
- 例子:在上述 SecurityFilterChain 中,我们可能会使用多个 SecurityFilter。例如,一个 SecurityFilter 可能会检查请求是否为 GET,另一个 SecurityFilter 可能会检查用户是否已登录,还有一个 SecurityFilter 可能会根据用户的角色授予相应的权限。
AuthenticationManager:
- 作用:AuthenticationManager 是 Spring Security 中的认证管理器,用来对登录请求进行处理。当处理用户的登录请求时,例如在使用表单登录时,AuthenticationManager 的 authenticate 方法会被调用来处理请求。
- 设计目的:AuthenticationManager 这个接口的设计目的是对用户的未授信凭据进行认证,认证通过则返回授信状态的凭据,否则将抛出认证异常 AuthenticationException。
- 例子:当用户尝试登录时,在登录表单中输入用户名和密码,这些凭据将被传递给 AuthenticationManager。AuthenticationManager 会检查这些凭据是否有效。如果凭据有效,AuthenticationManager 将创建一个已认证的 Authentication 对象,该对象包含用户的详细信息和授权。如果凭据无效,AuthenticationManager 将抛出一个异常。

5.2 认证工作流程
认证是验证用户身份的过程,通常通过用户名和密码、数字证书或生物特征等手段进行。通过 Spring Security 的核心工作流程我们可以知道:Spring Security 具体的认证工作是交由 AuthenticationManager 执行的。
AuthenticationManager 的认证流程如下:
- 用户提交凭证:用户向系统提交用户名和密码等凭证信息。
- 认证管理器 (AuthenticationManager):接收到凭证后,AuthenticationManager 负责进行认证。
- 认证提供者 (AuthenticationProvider):AuthenticationManager 调用认证方法,该方法会
委托给配置的 AuthenticationProvider(认证提供者)。 - 用户详情服务 (UserDetailsService):认证提供者通过调用 UserDetailsService 加载用户的详细信息,通常是根据用户名加载用户对象。
- 用户详情 (UserDetails):UserDetailsService 返回一个实现了 UserDetails 接口的用户详情对象,其中包含了用户的详细信息和权限。
- 创建认证信息 (Authentication):认证提供者使用 UserDetails 对象创建一个 Authentication 对象,表示成功的认证。
- 安全上下文持有者 (SecurityContextHolder):创建的 Authentication 对象被存储到 SecurityContextHolder 中,以便后续的访问控制和安全操作使用。
- 返回认证结果:最终,认证结果以 Authentication 对象的形式返回给用户,表示用户已经成功通过认证。

Spring Security 的认证流程看似蛮复杂的。其实,它的认证流程和我们常规的认证方式是类似的。
- AuthenticationManager:不进行具体的认证处理,负责管理多个
AuthenticatonProvider,具体的认证交由能够处理当前认证的 AuthenticationProvider。 - AuthenticationProvider:进行具体认证,通过调用
UserDetailService从数据库或者其他地方加载用户信息。之后通过与用户提交的凭证信息进行匹配,若成功则生成Authentication对象,表示认证成功,反之,返回认证失败信息。 - UserDetailsService:它的主要作用是根据用户名加载用户的详细信息。加载的具体逻辑一般
由开发人员实现。 - UserDetails:用于表示用户的基本身份和授权信息(代表一个用户)。
- Authentication:用于表示用户在系统中的身份认证信息。具体来说,Authentication 接口主要用于封装认证过程中的关键信息,如认证的主体(Principal)、凭证(Credentials)、授权信息(Authorities)等。
- SecurityContextHolder:主要用于存储和访问当前用户的
Authentication对象,即表示当前用户身份认证信息的实例。

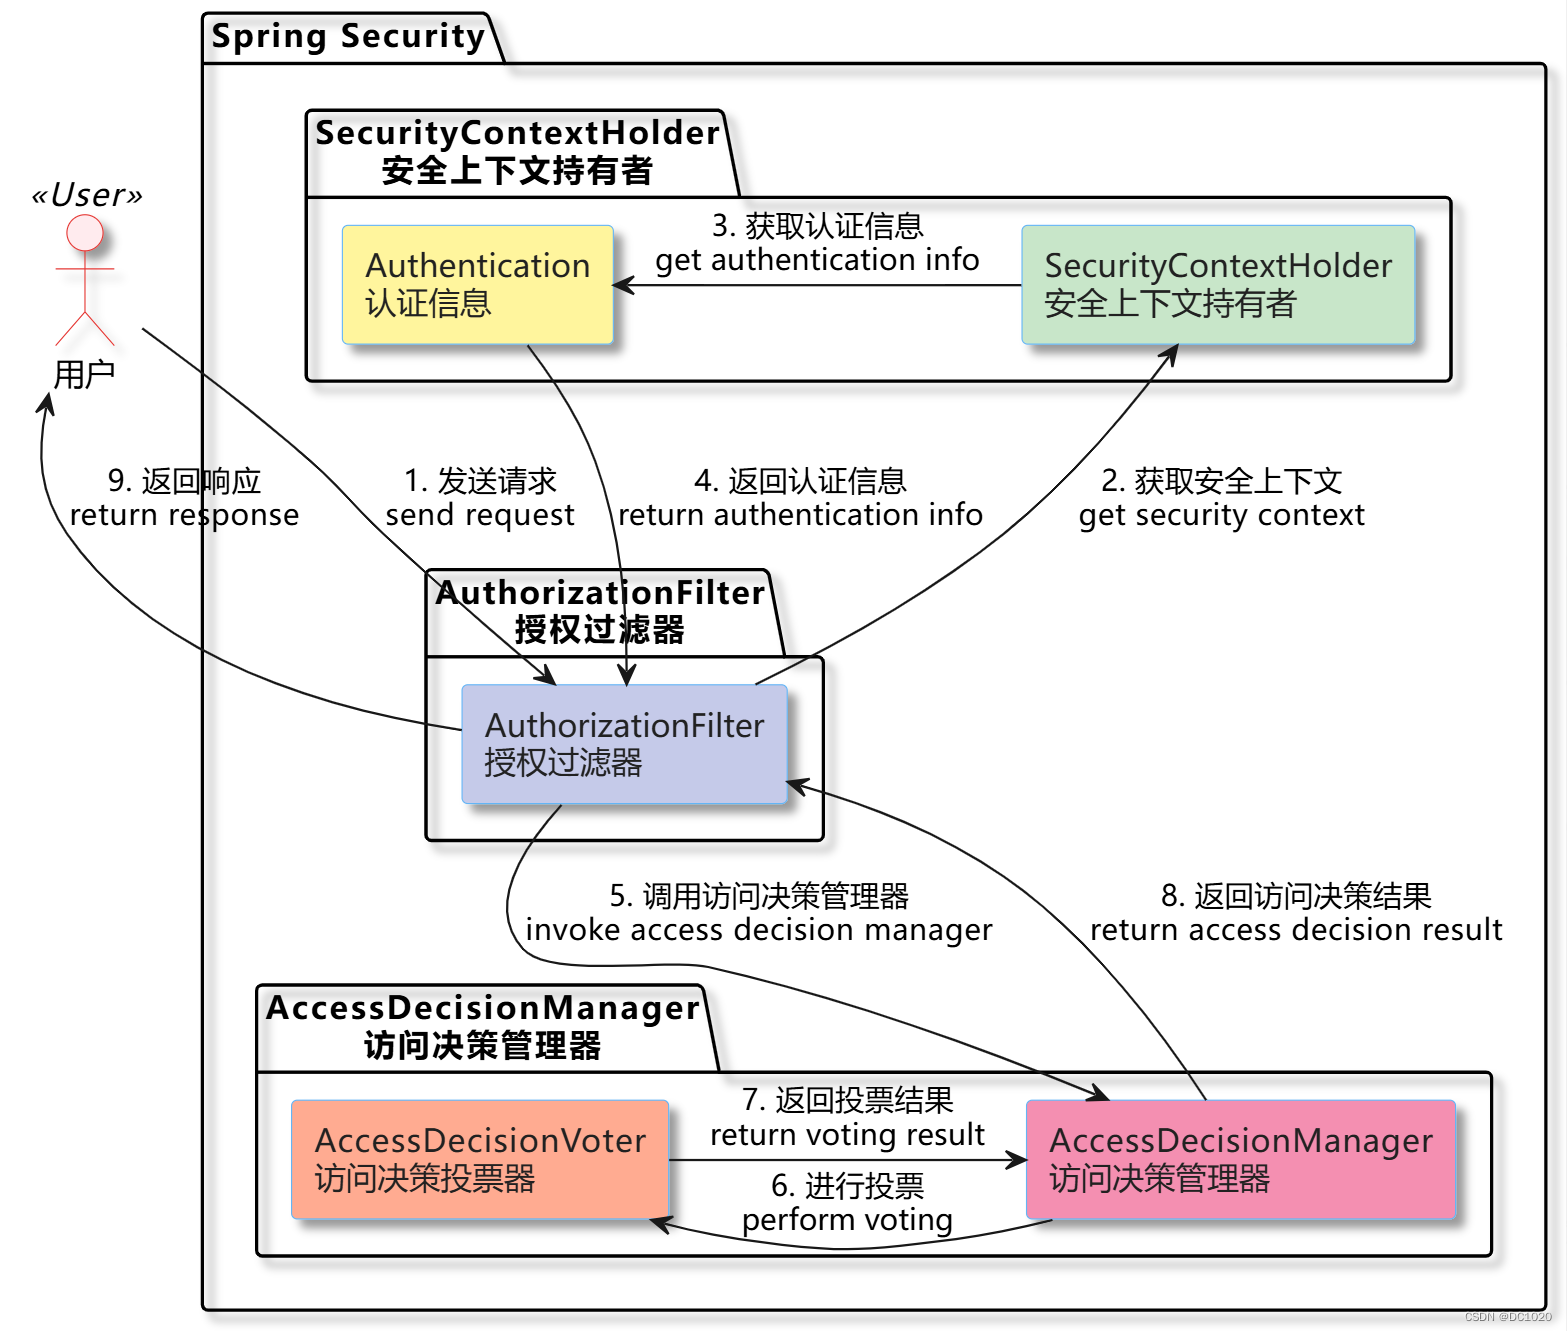
5.3 鉴权工作流程
鉴权是在确认用户身份后,决定用户是否有权访问特定资源或执行特定操作的过程。Spring Security 鉴权流程通常是在认证完成之后,即生成了 Authentication 对象之后进行的。其具体流程如下:
- AuthorizationFilter 授权过滤器:通过认证的请求被送到
AuthorizationFilter,它是 Spring Security 中的一个过滤器,负责处理所有的请求,并开启鉴权过程。 - 获取 Authentication 认证信息:通过
SecurityContextHolder从当前的安全上下文中获取用户的认证信息 (Authentication),这包括用户的身份凭证和权限信息。 - 调用 AccessDecisionManager 访问决策管理器:AuthorizationFilter 调用
AccessDecisionManager进行实际的访问决策。AccessDecisionManager 是一个核心组件,负责确定是否允许用户访问请求的资源或操作。AccessDecisionManager 可能会使用多个AccessDecisionVoter进行投票。AccessDecisionVoter 是决策的实际执行者,根据用户的认证信息和访问请求,投票是否允许访问资源或执行操作。 - 返回投票结果:每个
AccessDecisionVoter根据自身的逻辑判断是否允许访问。投票结果将汇总给AccessDecisionManager。 - 返回访问决策结果:
AccessDecisionManager将所有AccessDecisionVoter的投票结果综合起来,最终决定是否允许用户访问请求的资源或操作。 - 返回响应:
AuthorizationFilter将处理的结果返回给用户,响应用户的请求,这可能包括成功的访问授权或者拒绝访问的信息。
其实,鉴权的逻辑还是比较简单的,只是流程比较多,可以概括为:
- 首先,
AuthorizationFilter获取登录用户的认证信息(Authentication) - 然后,
AuthorizationFilter调用AccessDecisionManager判断权限
六、前后端分离
在之前的快速入门中,我们发现 Spring Security 默认情况下是采用前后端不分离的方式进行认证,而现在我们的项目一般都是前后端分离的方式(即: 前端通过 RESTful API 与后端进行通信,后端负责处理认证和授权,而前端则通过获取后端返回的 JWT(JSON Web Token)来管理用户的身份验证和授权状态)。要实现这一需求,我们可以参考如下步骤:
-
添加依赖:首先,在
pom.xml文件中添加 Spring Security 和 JWT 的依赖:<dependencies> <dependency> <groupId>org.springframework.boot</groupId> <artifactId>spring-boot-starter-web</artifactId> </dependency> <dependency> <groupId>org.springframework.boot</groupId> <artifactId>spring-boot-starter-security</artifactId> </dependency> <!-- JWT 依赖 --> <dependency> <groupId>io.jsonwebtoken</groupId> <artifactId>jjwt</artifactId> <version>0.9.1</version> <!-- 根据需要选择合适的版本 --> </dependency> </dependencies> <dependencyManagement> <dependencies> <dependency> <groupId>org.springframework.boot</groupId> <artifactId>spring-boot-dependencies</artifactId> <version>2.7.5</version> <type>pom</type> <scope>import</scope> </dependency> </dependencies> </dependencyManagement> -
创建用户服务实现类:创建一个实现
UserDetailsService接口的服务类,用于从数据库加载用户信息,并将其返回给 Spring Security 进行认证和授权。@Service public class UserDetailsServiceImpl implements UserDetailsService { // 模拟从数据库中查找用户 @Override public UserDetails loadUserByUsername(String username) throws UsernameNotFoundException { // 检查传入的用户名是否为"zs" if (!"zs".equals(username)) { // 如果用户名不是"zs",返回 null,表示没有找到对应的用户 return null; } // 创建并返回一个 UserDetails 对象,表示用户的详细信息 return User.builder() .username("zs") // 设置用户名为"zs" .password("$2a$16$RBoXNEqVxxtZ5l1QrJaMPub32Z8Q/e01tIG1Irs9ThxfXgeWxV1jq") // 设置加密后的密码 .authorities("add") // 设置用户的权限为"add" .build(); } } -
创建 JWT 工具类: 创建一个 JWT 工具类来生成和验证 JWT。
@Component public class JwtUtil { @Value("${jwt.secret}") private String secret; @Value("${jwt.expiration}") private long expiration; // 从令牌中提取用户名 public String extractUsername(String token) { return extractClaim(token, Claims::getSubject); } // 从令牌中提取过期时间 public Date extractExpiration(String token) { return extractClaim(token, Claims::getExpiration); } // 提取令牌中的声明 public <T> T extractClaim(String token, Function<Claims, T> claimsResolver) { final Claims claims = extractAllClaims(token); return claimsResolver.apply(claims); } // 解析令牌 private Claims extractAllClaims(String token) { return Jwts.parser().setSigningKey(secret).parseClaimsJws(token).getBody(); } // 验证令牌是否过期 private Boolean isTokenExpired(String token) { return extractExpiration(token).before(new Date()); } // 生成令牌 public String generateToken(UserDetails userDetails) { return Jwts.builder() .setSubject(userDetails.getUsername()) .setIssuedAt(new Date()) .setExpiration(new Date(System.currentTimeMillis() + expiration * 1000)) .signWith(SignatureAlgorithm.HS256, secret) .compact(); } // 验证令牌 public Boolean validateToken(String token, UserDetails userDetails) { final String username = extractUsername(token); return (username.equals(userDetails.getUsername()) && !isTokenExpired(token)); } } -
配置 JWT 相关属性:在
application.properties或application.yml中配置 JWT 的密钥和过期时间:jwt: # 配置JWT相关的属性 secret: secretKey # 用于签名和验证JWT令牌的密钥 expiration: 86400 # JWT令牌的有效期,以秒为单位。这里设置为86400秒(即24小时) -
创建 JWT 认证过滤器:创建一个 JWT 认证过滤器来拦截每个请求,并验证 JWT。
// 这个类继承自 OncePerRequestFilter,确保在每次请求时只调用一次过滤器 @Component public class JwtRequestFilter extends OncePerRequestFilter { // 注入JwtUtil工具类 @Resource private JwtUtil jwtUtil; // 注入UserDetailsServiceImpl类,用于加载用户详细信息 @Resource private UserDetailsServiceImpl userDetailsService; // 重写OncePerRequestFilter的doFilterInternal方法,用于处理每个HTTP请求 @Override protected void doFilterInternal(HttpServletRequest request, HttpServletResponse response, FilterChain chain) throws ServletException, IOException { // 从请求头中获取Authorization信息 final String authorizationHeader = request.getHeader("Authorization"); // 初始化用户名和JWT令牌变量 String username = null; String jwt = null; // 检查Authorization头是否以"Bearer "开头 if (authorizationHeader != null && authorizationHeader.startsWith("Bearer ")) { // 提取JWT令牌(去掉"Bearer "部分) jwt = authorizationHeader.substring(7); // 使用jwtUtil从令牌中提取用户名 username = jwtUtil.extractUsername(jwt); } // 如果用户名存在且当前没有已认证的用户 if (username != null && SecurityContextHolder.getContext().getAuthentication() == null) { // 加载用户详细信息 UserDetails userDetails = this.userDetailsService.loadUserByUsername(username); // 验证JWT令牌 if (jwtUtil.validateToken(jwt, userDetails)) { // 创建UsernamePasswordAuthenticationToken对象,包含用户详细信息和权限 UsernamePasswordAuthenticationToken usernamePasswordAuthenticationToken = new UsernamePasswordAuthenticationToken(userDetails, null, userDetails.getAuthorities()); // 将认证信息设置到SecurityContextHolder中 SecurityContextHolder.getContext().setAuthentication(usernamePasswordAuthenticationToken); } } // 继续过滤链,处理下一个过滤器或目标资源 chain.doFilter(request, response); } } -
配置 Spring Security:开启 Spring Security 验证,配置 SecurityFilterChain。
@Configuration @EnableWebSecurity public class SecurityConfig { // 注入JwtRequestFilter对象,用于处理JWT认证 @Resource private JwtRequestFilter jwtRequestFilter; @Bean public SecurityFilterChain securityFilterChain(HttpSecurity http) throws Exception { http.csrf().disable() // 禁用CSRF保护 .authorizeRequests() // 配置请求授权 .antMatchers("/login").permitAll() // 对于"/login"路径,允许所有请求(无需认证) .anyRequest().authenticated() // 对于所有其他请求,需要认证 .and() // 在UsernamePasswordAuthenticationFilter之前添加JwtRequestFilter .addFilterBefore(jwtRequestFilter, UsernamePasswordAuthenticationFilter.class); return http.build(); } @Bean public AuthenticationManager authenticationManager( UserDetailsService userDetailsService, PasswordEncoder passwordEncoder) { // 创建一个DaoAuthenticationProvider DaoAuthenticationProvider authenticationProvider = new DaoAuthenticationProvider(); // 设置UserDetailsService authenticationProvider.setUserDetailsService(userDetailsService); // 设置PasswordEncoder authenticationProvider.setPasswordEncoder(passwordEncoder); // 返回包含这个认证提供者的ProviderManager return new ProviderManager(authenticationProvider); } @Bean public BCryptPasswordEncoder passwordEncoder() { // 创建一个强度为16的BCryptPasswordEncoder return new BCryptPasswordEncoder(16); } } -
创建认证接口和控制器:创建一个认证控制器来处理用户登录请求,并返回 JWT 给前端。
@RestController public class AuthController { @Resource private AuthenticationManager authenticationManager; @Resource private JwtUtil jwtUtil; @Resource private UserDetailsServiceImpl userDetailsService; @PostMapping("/login") public ResponseEntity<String> createAuthenticationToken(@RequestBody LoginRequest loginRequest) { // 创建一个未认证的UsernamePasswordAuthenticationToken对象 UsernamePasswordAuthenticationToken authenticationToken = UsernamePasswordAuthenticationToken.unauthenticated(loginRequest.getUsername(), loginRequest.getPassword()); // 调用AuthenticationManager的authenticate方法进行用户认证 authenticationManager.authenticate(authenticationToken); // 加载用户详细信息 UserDetails userDetails = userDetailsService.loadUserByUsername(loginRequest.getUsername()); // 生成JWT令牌 String jwt = jwtUtil.generateToken(userDetails); // 返回包含JWT令牌的响应 return ResponseEntity.ok(jwt); } } -
测试效果
首先,访问
localhost:8080/login获取到 token
然后,使用 token 访问
localhost:8080/test/hello
七、小结
Spring Security 提供了强大而灵活的安全解决方案,可以轻松集成到 Spring 应用程序中。但是我们不难发现 Spring Security 设计得确实复杂了那么亿点点 (¬‿¬)。Spring Security 的使用门槛虽然较高,但是如果明白了它的原理便可以无缝与 Spring 结合使用,在日常的开发中可以极大的提高开发效率,增强应用的安全性。
推荐阅读
- 深入探究 Spring Boot Starter:从概念到实践
- 深入理解 Java 中的 volatile 关键字
- OAuth 2.0:现代应用程序的授权标准
- Spring 三级缓存
- 深入了解 MyBatis 插件:定制化你的持久层框架


![[leetcode hot 150]第三题,无重复字符的最长子串](https://img-blog.csdnimg.cn/direct/23c8fc5589dd443d8551ae4b06ab7712.png)